4. Core Apps Deployment
We will deploy:
- Traefik, the Ingress Controller
- MetalLB advertisements, for Load Balancing
- CoreDNS, the internal DNS for Kubernetes
- Sealed Secrets, secret management optimized for GitOps
- Cert-manager issuers, generate your SSL certificates and enable, for free, TLS configuration.
- Argo CD, to enable GitOps.
- Multus CNI, to support multiple network interfaces
Configuring MetalLB
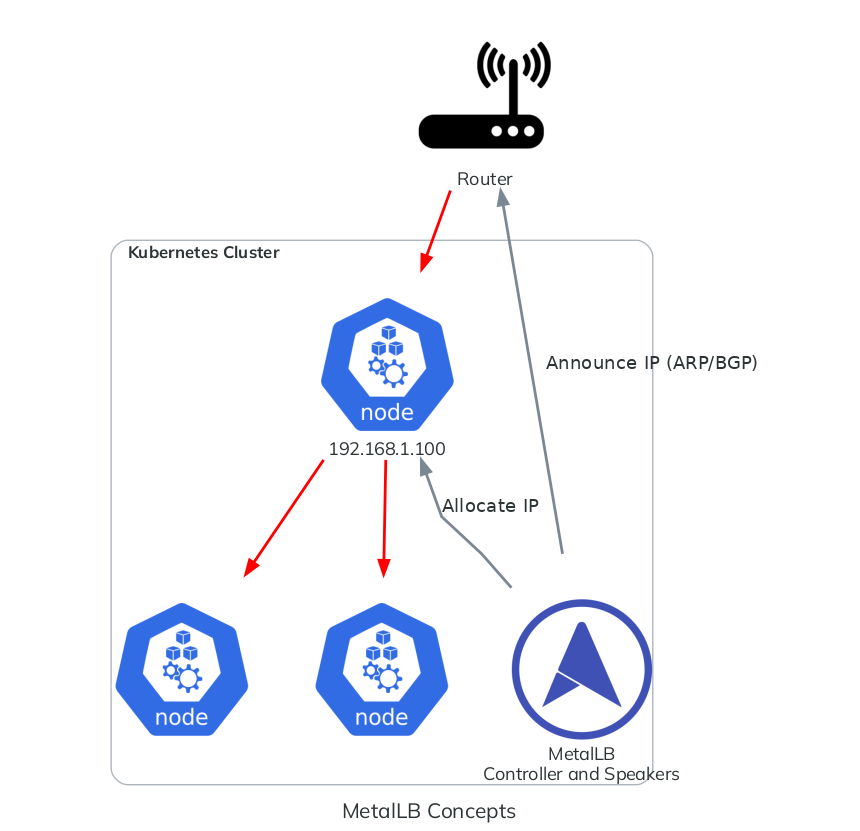
We need to configure MetalLB to expose Kubernetes Services like Traefik to the external network.
MetalLB is an L2/L3 load balancer designed for bare metal Kubernetes clusters. It exposes the Kubernetes Services to the external network. It uses either L2 (ARP) or BGP to advertise routes. It is possible to make "zoned" advertisements with L2, but we heavily recommend using BGP for multi-zone clusters.
Multi-zone (BGP)
This is the most stable solution, the router must be capable of using BGP. If not, you should use an appliance with BGP capabilities (like OPNsense, OpenWRT, vyOS, or Linux with BIRD) which can act like a router.
Let's start configuring the main IPAddressPool:
apiVersion: metallb.io/v1beta1
kind: IPAddressPool
metadata:
  name: main-pool
  namespace: metallb
spec:
  addresses:
    - 192.168.1.100/32
The indicated IP address will be allocated to the LoadBalancer Kubernetes Services, which is Traefik.
We should now advertise the IP address by configuring a BGPAdvertisement and its peers:
apiVersion: metallb.io/v1beta2
kind: BGPPeer
metadata:
  name: main-router
  namespace: metallb
spec:
  myASN: 65001 # MetalLB Speaker ASN (Autonomous System Number)
  peerASN: 65000 # The router ASN
  peerAddress: 192.168.0.1 # The router address
apiVersion: metallb.io/v1beta1
kind: BGPAdvertisement
metadata:
  name: bgp-advertisement
  namespace: metallb
spec:
  ipAddressPools:
    - main-pool
With this configuration, the MetalLB speakers on all the nodes will advertise the IP address 192.168.1.100/32 to the router, which is at 192.168.0.1. By receiving the advertisement, the router will create a BGP route 192.168.1.100/32 via <ip of the node>.
Single zone (L2/ARP)
Let's start configuring the main IPAddressPool:
apiVersion: metallb.io/v1beta1
kind: IPAddressPool
metadata:
  name: main-pool
  namespace: metallb
spec:
  addresses:
    - 192.168.0.100/32
By using ARP, every machine in the super net will be able to see that machine. For example, we are announcing 192.168.0.100. This IP is part of 192.168.0.0/24 and therefore, all the machines will be able to see 192.168.0.100.
The indicated IP address will be allocated to the LoadBalancer Kubernetes Services, which is Traefik.
We should now advertise the IP address by configuring a L2Advertisement:
apiVersion: metallb.io/v1beta1
kind: L2Advertisement
metadata:
  name: l2-advertisement
  namespace: metallb
spec:
  ipAddressPools:
    - main-pool
That's all! The MetalLB speakers on all the nodes will advertise the IP address 192.168.1.100/32 to the router via ARP. You can also use an IP in the same subnet as the host.
Configuring Traefik
Traefik is the main L7 load balancer and router. It is mostly used to route HTTP packets based on rules (URL path, headers, ...).
To configure Traefik, edit the core/traefik/values.yaml file, which is the main configuration file.
You should look for loadBalancerIP and the metallb.universe.tf annotations:
service:
  enabled: true
  annotations:
    metallb.universe.tf/address-pool: main-pool
    metallb.universe.tf/allow-shared-ip: traefik-lb-key
  spec:
    externalTrafficPolicy: Cluster # Load Balance horizontally via MetalLB too
Since we are using MetalLB, we select our IPAddressPool by using the metallb.universe.tf/address-pool annotation.
After that, you can add or remove ports:
ports:
  traefik:
    port: 9000
    expose: true
    exposedPort: 9000
    protocol: TCP
  dns-tcp:
    port: 8053
    expose: true
    exposedPort: 53
    protocol: TCP
  dns-udp:
    port: 8054
    expose: true
    exposedPort: 53
    protocol: UDP
  web:
    port: 80
    expose: true
    exposedPort: 80
    protocol: TCP
  websecure:
    port: 443
    expose: true
    exposedPort: 443
    protocol: TCP
    # You MUST open port 443 UDP!
    # HTTP3 upgrades the connection from TCP to UDP.
    http3:
      enabled: true
    tls:
      enabled: true
  metrics:
    port: 9100
    expose: false
    exposedPort: 9100
    protocol: TCP
Since Traefik will be used as the main Ingress, these ports will be exposed to the external network if expose is set to true.
You can also configure the dashboard route:
ingressRoute:
  dashboard:
    enabled: true
    # See your DNS configuration
    matchRule: Host(`traefik.internal`)
    entryPoints: ['traefik']
This means that the Traefik dashboard is accessible to traefik.internel on the traefik entry point, which is the 9000/tcp port. In short: http://traefik.internal:9000/dashboard/ (the trailing slash is important).
Your DNS should be configured to redirect traefik.internal to the load balancer at 192.168.1.100 (or 192.168.0.100 if using L2). Fortunately, we configure and expose our the CoreDNS.
For the rest of the guide, we will assume that you have announced 192.168.1.100/32 to the router.
CoreDNS configuration
The CoreDNS given by k0s does not meet our needs, so we added --disable-components coredns in the installFlags of cfctl.yaml. We will deploy our own.
CoreDNS will be exposed to the external network thanks to the IngressRoute objects in the core/coredns/overlays/prod/ingress-route.yaml. It is also exposed using hostPort (core/coredns/overlays/prod/daemonset.yaml).
Since hostPort will be used, make sure the host does not have port 53/udp busy. On most systems with SystemD, this port is occupied by a stub listener. Open the /etc/systemd/resolved.conf configuration file on the Kubernetes hosts and disable the stub listener by setting DNSStubListener to no. Finally, restart the service with systemctl restart systemd-resolved.service.
./scripts/deploy-core
The files that you should look for are core/coredns/overlays/prod/configmap.yaml and core/coredns/overlays/prod/daemonset.yaml.
Inside the ConfigMap, you'll find:
apiVersion: v1
kind: ConfigMap
metadata:
  name: coredns
  namespace: kube-system
  labels:
    k0s.k0sproject.io/stack: coredns
data:
  Corefile: |
    .:53 {
      errors
      health {
        lameduck 5s
      }
      ready
      kubernetes cluster.local in-addr.arpa ip6.arpa {
        pods insecure
        fallthrough in-addr.arpa ip6.arpa
        ttl 30
      }
      prometheus :9153
      forward . 8.8.8.8
      cache 30
      loop
      reload
      loadbalance
      }
      internal:53 {
        log
        errors
        ready
        hosts /etc/coredns/internal.db
        reload
      }
      example.com:53 {
        log
        errors
        ready
        hosts /etc/coredns/example.com.db
        reload
      }

  internal.db: |
    192.168.1.100 traefik.internal
    192.168.1.100 argocd.internal

  example.com.db: |
    # Examples of external services
    192.168.0.1 gateway.example.com
    192.168.0.2 mn1.example.com
    192.168.0.3 grendel.example.com
    192.168.0.5 cvmfs.example.com
    192.168.0.6 nfs.example.com
    192.168.0.7 mysql.example.com
    192.168.0.8 ldap.example.com

    192.168.0.10 slurm-cluster-example-controller-0.example.com
    192.168.0.20 slurm-cluster-example-login-0.example.com
    192.168.0.21 slurm-cluster-example-login-1.example.com
    192.168.0.51 cn1.example.com

    # Internal services
    192.168.1.100 prometheus.example.com
    192.168.1.100 grafana.example.com
There are three DNS zones in this configuration:
- The general zone
.:53, which forwards DNS requests to8.8.8.8and announces the Kubernetes Services and Pod domain names. - The internal zone
internal:53, which contains rules to access the ArgoCD and Traefik dashboard. - The internal zone
example.com:53, which contains examples of rules to access to other services.
Modify the zones with your own custom ones and update the forward field with your preferred DNS. Additionally, you can add, remove or modify domain names as per your requirements. Please note the following:
- For Kubernetes Services that are routed through the Traefik Load Balancer, you must use the MetalLB IP.
- If you are using
hostPorton your pod (such as the Slurm Controller), set the IP to be the Kubernetes host that is hosting the pod. - If you are using IPVLAN, set the IP to be the IP that you declared in the IPVLAN settings.
You should configure the DNS of your machines to use CoreDNS.
nameserver 192.168.1.100
search example.com
Be aware of the chicken-egg problem, you do NOT want to have the Kubernetes hosts using the DNS.
If some files were added and removed, you must change the daemonset.yaml:
        volumes:
          - name: config-volume
            configMap:
              name: coredns
              items:
                - key: Corefile
                  path: Corefile
                - key: example.com.db
                  path: example.com.db
                - key: internal.db
                  path: internal.db
+               - key: your.new.file.db
+                 path: your.new.file.db
              defaultMode: 420
Configure the cert-manager issuers
Specify new certificate issuers in the core/cert-manager directory.
It is highly recommended adding your own private certificate authority, follow the official guide of cert-manager.
You must create a Secret ca-key-pair. To generate a TLS certificate and its private key:
openssl genrsa -out tls.key 2048
openssl req -x509 -sha256 -new -nodes -key tls.key -days 3650 -out tls.crt
kubectl create secret tls ca-key-pair -n cert-manager --cert=tls.crt --key=tls.key
rm ca-key-pair-secret.yaml
Then you can create a private ClusterIssuer:
apiVersion: cert-manager.io/v1
kind: ClusterIssuer
metadata:
  name: private-cluster-issuer
  namespace: cert-manager
spec:
  ca:
    secretName: ca-key-pair
Edit the production ClusterIssuer to use your email address:
apiVersion: cert-manager.io/v1
kind: ClusterIssuer
metadata:
  name: production-cluster-issuer
  namespace: cert-manager
spec:
  acme:
    email: john.smith@example.com
    server: https://acme-staging-v02.api.letsencrypt.org/directory
    privateKeySecretRef:
      name: production-cluster-issuer-account-key
    solvers:
      - http01:
          ingress:
            class: traefik
The production ClusterIssuer will contact the ACME servers to generate public TLS certificates on trusted root CA servers.
Configure the route and certificate for the ArgoCD dashboard
ArgoCD has a dashboard. To change the URL and certificate, modify the ingress-route.yaml file and certificate.yaml in the core/argo-cd directory.
Make sure the domain name correspond to the ones defined in the CoreDNS (or in your private DNS).
apiVersion: traefik.io/v1alpha1
kind: IngressRoute
metadata:
  name: argocd-server-https
  namespace: argocd
  labels:
    app.kubernetes.io/name: argocd-server-https
    app.kubernetes.io/component: ingress-route
spec:
  entryPoints:
    - websecure
  routes:
    - kind: Rule
      match: Host(`argocd.internal`)
      priority: 10
      services:
        - name: argocd-server
          port: 80
    - kind: Rule
      match: Host(`argocd.internal`) && HeadersRegexp(`Content-Type`, `^application/grpc.*$`)
      priority: 11
      services:
        - name: argocd-server
          port: 80
          scheme: h2c
  tls:
    secretName: argocd.internal-secret
IngressRoute allows us to create more complex routing rules than the classic Ingress. However, Ingress can automatically generate a TLS certificate by using annotations, without the need to create a Certificate resource.
Our recommendation is to use Ingress for simple routes with HTTP. Otherwise, IngressRoute is the best solution for all cases.
Deploying the core apps
Run the ./scripts/deploy-core script to deploy the core applications. This should deploy:
- Traefik
- CoreDNS
- MetalLB
- MultusCNI
- sealed-secrets
- cert-manager
- ArgoCD
If the script fails, you can run it again without harming the cluster.
If CoreDNS and the IngressRoutes are configured, you should be able to access the ArgoCD dashboard and Traefik dashboard.
Congratulations! You have successfully deployed a Kubernetes Cluster with the minimum requirements. We still recommend deploying the Monitoring stack to monitor the RAM and CPU usage of the containers. Nevertheless, you can follow the guides, learn the main concepts of ClusterFactory, or continue the Getting Started.